How Many Ports Are on a Patch Panel? Complete Guide
2026-03-30
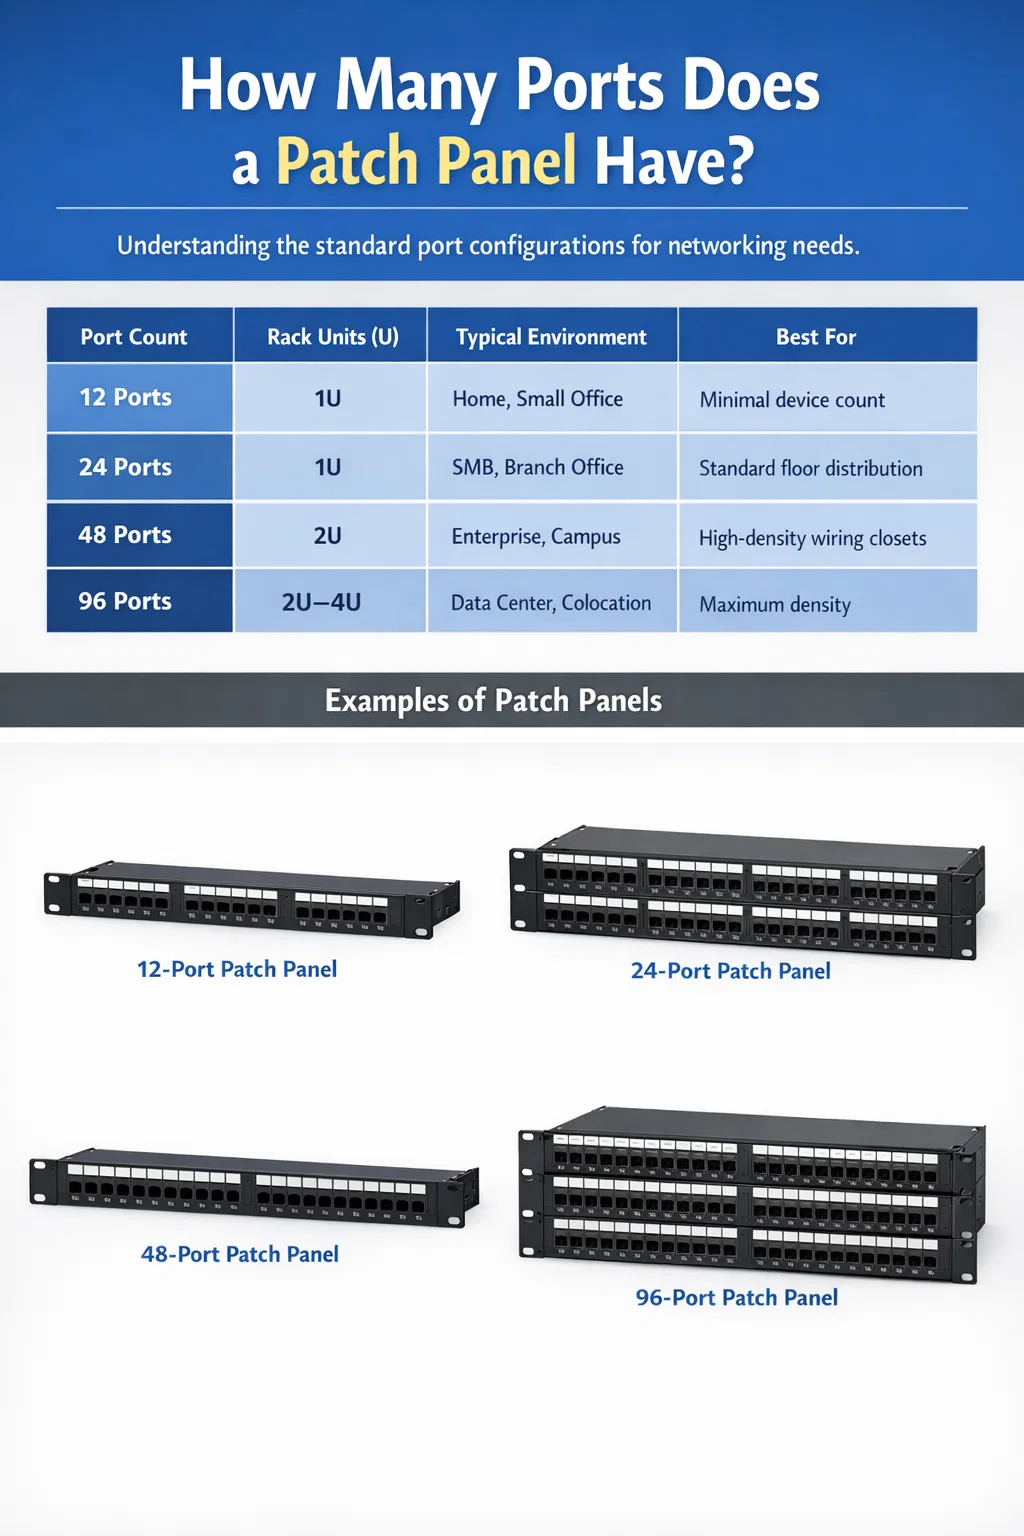
How Many Ports Does a Patch Panel Have?
A network patch panel typically comes in 12, 24, 48, or 96 ports, with 24-port and 48-port models being the most widely deployed in commercial and enterprise environments. The 24-port patch panel fits into 1U of rack space, while the 48-port version occupies 2U. Smaller 12-port panels are common in home setups or compact telecom closets, and high-density 96-port panels are found in large data centers where rack space is at a premium.
Port count is not arbitrary — it directly determines how many network devices you can terminate and manage from a single panel. Choosing the wrong port count leads to either wasted rack real estate or chaotic cable sprawl that becomes a maintenance nightmare over time. Understanding the available configurations is the first step toward a clean, scalable network infrastructure.
| Port Count | Rack Units (U) | Typical Environment | Best For |
|---|---|---|---|
| 12-port | 1U | Home, small office | Minimal device count, tight spaces |
| 24-port | 1U | SMB, branch office | Standard floor distribution |
| 48-port | 2U | Enterprise, campus | High-density wiring closets |
| 96-port | 2U–4U | Data center, colocation | Maximum density, server farms |
The Standard Port Configurations Explained
Each port count configuration serves a specific purpose, and understanding the practical differences helps you avoid over-specifying or under-building your cabling infrastructure.
12-Port Patch Panels
The 12-port network patch panel is the smallest standard configuration available. It occupies 1U of rack space and is typically used in residential installations, small retail locations, or supplementary closets where only a handful of drops need to be terminated. A 12-port panel is also a practical choice when you need to segregate a specific part of the network — for example, isolating VoIP lines or security camera feeds — without dedicating a full 24-port panel to that purpose. Because of its compact footprint, the 12-port panel fits into wall-mount enclosures as small as 6U.
24-Port Patch Panels
The 24-port patch panel is the most common configuration in the industry. It handles a typical office floor with 20 to 24 workstations while leaving a few ports open for shared devices like printers, access points, or IP phones. At 1U, it pairs neatly with a 24-port managed switch in the same rack unit grouping, which keeps your cable runs short and your labeling straightforward. Most structured cabling standards, including TIA-568, are built around 24-port increments, making this size the default for most IT planners and contractors.
48-Port Patch Panels
At 2U, the 48-port panel is essentially two 24-port panels consolidated into a single unit. It is the preferred option for enterprise wiring closets that serve dense open-plan offices, warehouses, or manufacturing floors where upwards of 40 drops converge in a single rack. Using a 48-port panel instead of two 24-port panels saves 1U of rack space and reduces the number of panels to label and manage. In a 42U rack where every unit matters, that saving is meaningful, especially when you factor in cable managers, switches, UPS units, and patch cable slack.
96-Port Patch Panels
The 96-port panel pushes density to its practical limit within standard 19-inch rack infrastructure. These panels typically use angled or toolless keystone jacks to accommodate the high concentration of ports and patch cables. You will find them primarily in data centers, large colocation facilities, and telecommunications rooms where hundreds of server ports, storage connections, or fiber handoffs must be organized. Some 96-port panels are designed around a modular cassette system, where individual 12-port or 24-port cassettes slot into a chassis frame — giving you the flexibility to populate only what you need while keeping space reserved for future expansion.
Factors That Determine Which Port Count You Need
Selecting the right port count for your network patch panel is not a matter of picking the largest number available. Several concrete variables should drive the decision, and ignoring them leads to either wasted budget or a cabling system that fails to scale.
Number of Cable Drops in the Area
Count every active cable run terminating in the closet or rack. Include drops for workstations, VoIP phones, IP cameras, wireless access points, and any IoT devices. The patch panel must have at least as many ports as active cable drops, plus a growth buffer of 15 to 20 percent. If you currently have 38 drops, a 48-port panel is the logical choice. It gives you 10 spare ports without requiring a second panel or a larger chassis right away.
Available Rack Space
Rack space is a finite resource, and every component competes for it. A typical 42U rack filled with two switches, a router, a firewall, a UPS, and two 1U cable managers already has roughly 14U spoken for before a single patch panel is installed. If you are working with a 12U wall-mount rack in a small office, fitting two 24-port panels side by side with their associated cable management may be impossible. In that case, a single 48-port panel at 2U is more practical than two 24-port panels at 1U each, since cable managers typically add another 1U per panel row.
Cable Category and Signal Type
Cat5e, Cat6, Cat6A, and Cat8 copper panels all come in the same standard port counts, but their physical dimensions differ. Cat6A panels, for example, are often slightly taller or deeper than Cat6 panels because the larger cable diameter requires more bend radius and the connectors themselves are physically bigger. A Cat6A 48-port panel may occupy 2U where a Cat6 48-port panel fits comfortably. Fiber patch panels — used for backbone runs, uplinks, and long-distance connections — follow a different port density model. LC duplex fiber panels commonly come in 24-port configurations within 1U, while MPO/MTP fiber cassette systems can pack 72 or more fiber connections into a single 1U panel.
Planned Network Expansion
A network patch panel is not something you replace every two years. A properly installed copper cabling infrastructure is expected to last 15 to 25 years under normal commercial use. That means the port count you choose today needs to accommodate growth you cannot fully predict. A company with 30 employees today may have 60 within five years. Building in headroom by sizing up to the next port tier — from 24 to 48, or from 48 to 96 — is almost always cheaper than retrofitting additional panels and re-running cables later.
Patch Panel Types and How Port Count Varies Across Them
Not all network patch panels are built the same way. The internal design of the panel affects how many ports can be physically accommodated, how cables are managed on the rear, and how easily the panel can be reconfigured or repaired.
Fixed Punch-Down Patch Panels
Fixed panels have pre-installed jacks that are wired directly via a 110-punch tool on the rear. These are the most common type in structured cabling installations and are available in all standard port counts — 12, 24, 48, and 96. Because the jacks are permanently integrated, fixed panels are robust and cost-effective for installations where the cable layout is unlikely to change frequently. They are available in Cat5e, Cat6, and Cat6A ratings and support both T568A and T568B wiring standards.
Keystone Patch Panels
Keystone panels use a modular design in which individual keystone jack inserts snap into a blank panel frame. A 24-port keystone patch panel chassis has 24 keystone slots, but you only populate the ports you need. If you start with 16 active drops, you install 16 jacks and leave the remaining 8 slots empty for future use. This modularity also means you can mix jack types — RJ45, coax, fiber, HDMI — within the same panel. Keystone panels are slightly more expensive per port than fixed panels but offer significant flexibility in dynamic environments.
Angled Patch Panels
Angled patch panels position the port face at a 45-degree angle toward one side of the rack. This design is particularly useful in high-density environments where patch cables need to exit cleanly toward an adjacent vertical cable manager without creating sharp bends. Angled panels are commonly used in 48-port and 96-port configurations in data centers. The angled design does not change the port count but significantly improves cable management ergonomics when dozens of patch cables are attached simultaneously.
Fiber Optic Patch Panels
Fiber patch panels use LC, SC, or MPO connectors and follow different density standards than copper panels. A standard 1U fiber patch panel with LC duplex connectors typically holds 24 ports, which equals 24 individual fiber connections or 12 duplex links. High-density MPO cassette-based fiber panels can deliver 72 to 96 fiber connections in a single 1U chassis, making them the go-to solution for backbone infrastructure in large buildings and data centers. Fiber patch panels are passive devices — they do not require power — but they demand significantly greater care during installation to avoid connector damage and insertion loss.
How Patch Panels Fit Into Your Overall Network Infrastructure
A patch panel does not operate in isolation. It is the central termination point that bridges permanent horizontal cable runs from the work area to the active network equipment in the telecommunications room or data center. Understanding where the patch panel sits in the overall network design clarifies why port count planning is so critical.
In a typical structured cabling design, horizontal cables run from wall outlets or floor boxes at each workstation to the patch panel in the nearest IDF (Intermediate Distribution Frame) closet. From the patch panel, short patch cables — usually 1 to 3 feet long — connect to the corresponding ports on the access layer switch. Each port on the patch panel corresponds to exactly one physical cable drop, which in turn connects to one network device at the user end. This one-to-one relationship is what makes port count planning a direct reflection of your device count.
The patch panel also serves as the documentation layer for the entire horizontal cabling plant. When ports are clearly labeled with room numbers, desk numbers, or device IDs, troubleshooting a faulty connection becomes a matter of tracing a label rather than crawling through walls. This is where port count affects operational efficiency — a well-populated 24-port panel with clear labels is far easier to manage than an overstuffed 48-port panel where half the ports are unlabeled and patch cables are tangled.
Port Utilization Best Practices for Network Patch Panels
Having the right number of ports on a patch panel matters, but how you use and manage those ports is equally important. Industry professionals follow a set of practical conventions that keep cabling infrastructure clean, documentable, and maintainable over its full lifespan.
- Label every port on both the front and the rear of the panel before cabling begins. Use a consistent naming scheme — for example, room number followed by outlet number (e.g., 204-A, 204-B) — so that any technician can cross-reference the panel to the floor plan without prior knowledge of the installation.
- Never fill a patch panel to 100 percent capacity in the initial installation. Reserve at least 20 percent of ports for future moves, adds, and changes. On a 24-port panel, that means targeting no more than 19 active connections on day one.
- Use color-coded patch cables to visually segment traffic types. A common convention is blue for data, gray for VoIP, yellow for management traffic, and red for critical infrastructure connections. This color coding only works if it is documented and consistently applied.
- Install a 1U horizontal cable manager above or below each panel row. This keeps patch cables organized, prevents excessive tension on the RJ45 connectors, and makes it possible to move or replace a patch cable without disturbing adjacent connections.
- Document every port in a cable management database or spreadsheet immediately after installation. Port-level documentation becomes the single most valuable tool for any IT team managing the infrastructure years after the original installer has moved on.
- Use patch cables that are no longer than necessary. Excess cable length creates slack that bunches up and blocks airflow in the rack. For connections between a patch panel and a switch in the same rack, 1-foot or 2-foot patch cables are almost always sufficient.
Calculating the Right Number of Patch Panel Ports for Your Deployment
There is a straightforward method for sizing a patch panel installation correctly. It starts with a physical count and ends with a port allocation model that accounts for present needs and near-term growth.
- Count all active cable runs terminating in the closet. Include workstations, phones, APs, cameras, printers, and any dedicated device drops.
- Add infrastructure ports for uplinks, patch connections between IDF and MDF, and any management ports you plan to connect through the panel rather than directly into the switch.
- Apply a 20 percent growth buffer to the combined total. If you have 40 active drops and 4 infrastructure ports, your working number is 44, plus 20 percent = approximately 53 ports needed.
- Round up to the next standard panel size. In the example above, 53 ports rounds up to two 48-port panels (96 total ports), giving you generous headroom. Alternatively, if budget and space are tight, a single 48-port panel plus one 12-port panel gives you 60 ports across 3U of rack space — a reasonable and more economical solution.
- Confirm rack space availability by adding up the U requirements for every component — switches, routers, patch panels, cable managers, UPS units — and verifying they fit within the rack's total height.
This five-step calculation takes less than 30 minutes on a new installation and saves hours of reactive troubleshooting and re-cabling later. It also forms the basis of a cabling specification document that contractors can bid against and that your IT team can reference when the infrastructure is inherited or handed off.
Common Mistakes When Choosing Patch Panel Port Counts
Even experienced network planners make sizing errors when specifying patch panels. These mistakes are worth understanding because they are almost always avoidable with a bit of upfront planning.
Under-Specifying Port Count to Save Cost
A 24-port panel costs roughly $30 to $80 depending on the category rating. A 48-port panel costs $60 to $150. The price difference is small in absolute terms, but the cost of re-cabling a closet that was under-specified — pulling new cable, purchasing additional panels and cable managers, paying a technician for a full day of work — can easily reach $1,000 to $5,000 or more for a single IDF. Choosing a smaller panel to save $40 upfront is false economy in almost every commercial deployment scenario.
Over-Specifying Without Considering Rack Space
Going straight to a 96-port panel when you only have 30 drops is equally problematic. A half-populated 96-port panel wastes rack space, costs more than necessary, and creates a confusing layout where active ports are scattered across a large surface area. More critically, large panels require proportionally larger cable managers and more patch cables, all of which consume rack units that could be allocated to active equipment.
Ignoring Cable Category Compatibility
Installing Cat6 patch panels on Cat6A horizontal cable runs downgrades the performance of the entire channel. The patch panel is part of the permanent link and must be rated to at least the same category as the cable it terminates. Similarly, using a Cat5e patch panel with Cat6 cable negates the crosstalk and bandwidth improvements that Cat6 cable provides. Always match the patch panel category to the cable category and verify that the complete channel — panel, patch cable, jack, and horizontal cable — is tested and certified together after installation.
Forgetting to Account for Uplink and Backbone Ports
Many planners count only user-facing horizontal cable drops and forget that uplink cables between IDFs and the MDF also terminate in the patch panel. In a building with three floors and a central MDF, each IDF needs at least two or four uplink ports for the fiber backbone or copper uplinks to the core switch. These ports consume panel space just like any other connection and must be included in the port count calculation from the beginning.
Patch Panel Port Counts in Specific Deployment Scenarios
Real-world deployments vary enormously in scale and complexity. Looking at specific scenarios helps translate abstract port count principles into concrete decisions.
Small Office with 15 Employees
A single-floor office with 15 workstations typically generates 30 to 40 cable drops when you account for dual drops per desk (one for data, one for VoIP), two to three wireless access points, a network printer, and a couple of spare drops in conference rooms. A single 48-port patch panel handles this comfortably with 8 to 18 ports in reserve. This setup fits in a 12U wall-mount cabinet alongside a 48-port switch and a small UPS.
Multi-Floor Corporate Office with 200 Employees
A 200-person office spread across four floors will typically have one IDF per floor and a central MDF. Each IDF serves 50 employees with approximately 100 to 130 cable drops per floor, requiring two to three 48-port panels per IDF, or alternatively a mix of 48-port and 24-port panels depending on the exact drop count. The MDF aggregates backbone uplinks from all four IDFs and hosts the core switch infrastructure, typically requiring additional patch panels for the uplink cables alone.
Colocation Data Center Cabinet
In a colocation data center, a single 42U cabinet might house 10 to 20 servers, each with 2 to 4 network interfaces. That translates to 20 to 80 active network ports in a single rack. A high-density 96-port patch panel at 2U is the preferred solution here, often used in conjunction with a top-of-rack switch and MPO fiber cassettes for uplinks. The goal is to terminate as many connections as possible within the lowest number of rack units, leaving more space for revenue-generating equipment.
School or University Building
Educational facilities present unique cabling challenges because they combine high-density classroom drops with variable occupancy patterns. A typical secondary school classroom might have 35 student positions plus a teacher station, a projector, and one or two access points — 10 to 15 cable drops per room. A building with 20 classrooms generates 200 to 300 drops that need to be distributed across multiple IDFs. 48-port panels are the workhorse in these environments, with the exact count determined by how many drops are aggregated in each closet.
cooperar com Puxin?
Entre em contato conosco para descobrir como nossos produtos podem transformar seus negócios e
Leve -o para o próximo nível.
A Ningbo Puxin Electronic Technology Co., Ltd. é um fornecedor profissional de investigação, desenvolvimento e fabrico de produtos de engenharia elétrica e cablagem integrada.
-

No.43 da estrada Xiaotuanpu, cidade de Guanhaiwei, cidade de Cixi Ningbo, Zhejiang, China
-

-

+86-15924366333
-


Copyright © Ningbo Puxin Electronic Technology Co., Ltd.
